Installing BitTorrent Sync on Raspberry Pi
A detailed tutorial on setting up your Pi to run a replacement for DropboxThere are many solutions to build your own cloud like Seafile, ownCloud or clouddav. Those are great solutions, but all rely on a central server; if this server is turned off or crashes, sync will no longer work. Bittorrent Sync is different: it syncs content using peer-to-peer file sharing. You can read about Bittorrent Sync here.
This tutorial shows how to install Bittorrent Sync on Rasperry Pis.
What you need
The standard Raspberry Pi hardware will do:
- Raspberry Pi Model B (or the model A with USB ethernet or wlan interface)
- USB power supply
- SD card
- SD card writer
- (optional) Raspberry Pi enclosure
I’m using Window as my host system but all steps except for writing the ISO image are the same on all platforms. The following software is used for this tutorial:
- Putty, to connect to the Raspberry Pi with SSH. You don’t necessarily need SSH if you hook up your Raspberry Pi to a monitor and keyboard.
- Nmap: I’m doing a completely headless raspbian install (i.e., without ever connecting the device to a monitor and keyboard). To SSH to the device I’m first using Nmap to find out the IP address of my Raspberry Pi. Again this is not necessary if you connect the device to a monitor. There are also plenty of other ways to find out the IP – or you might connect to the Pi using it’s default hostname raspberry
- I’m using Raspbian as the operating system.
- The Raspbian image is written to the SD card using Win32DiskImager.
Part 1: Installing and Configuring the Raspberry Pi
If you already have a Rasperry Pi running, then the following steps are not necessary and you can jump right to Part 2.
Download the Raspbian ISO.
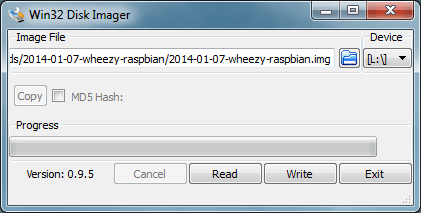
Download Win32DiskImager which allows you to write the ISO file to the SD card.
Insert the SD card into your SD card writer.
Run Win32DiskImage as administrator.
Select the Raspbian image as
Image Fileand the device letter of your SD card asDevice. Warning: make sure not to select any external hard disks as theDevice; this might lead to data loss on the selected device.
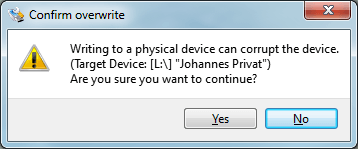
Click
Writeand confirm it’s the right device by clickingYes:
It might take some time to write the ISO. Upon completion you should see the following message:

Put the SD card into Raspberry PI, connect the device to your network, and power on the device by plugging in the USB power supply cable.
Wait around one minute to let the device boot. Then find out its IP using
NmapC:\>nmap -sn 192.168.1.0/24 Starting Nmap 6.40 ( http://nmap.org ) at 2014-05-01 19:34 W. Europe Daylight Time Nmap scan report for 192.168.1.65 Host is up (0.11s latency). Nmap scan report for 192.168.1.69 Host is up (0.028s latency). Nmap scan report for raspberrypi.lan (192.168.1.70) Host is up (0.068s latency). Nmap scan report for xxxxxxxxxxx.lan (192.168.1.254) Host is up (0.0040s latency). Nmap done: 256 IP addresses (4 hosts up) scanned in 14.88 secondsIn my case the Raspberry got 192.168.1.70.
Connect to the device using SSH (the default password is
raspberry):C:\>ssh pi@192.168.1.70 The authenticity of host '192.168.1.70 (192.168.1.70)' can't be established. RSA key fingerprint is 35:33:47:1d:f3:6b:6e:3a:2f:cf:17:d8:e1:d5:02:6f. Are you sure you want to continue connecting (yes/no)? yes Warning: Permanently added '192.168.1.70' (RSA) to the list of known hosts. pi@192.168.1.70's password: Linux raspberrypi 3.10.25+ #622 PREEMPT Fri Jan 3 18:41:00 GMT 2014 armv6l The programs included with the Debian GNU/Linux system are free software; the exact distribution terms for each program are described in the individual files in /usr/share/doc/*/copyright. Debian GNU/Linux comes with ABSOLUTELY NO WARRANTY, to the extent permitted by applicable law. NOTICE: the software on this Raspberry Pi has not been fully configured. Please run 'sudo raspi-config' pi@raspberrypi ~ $Change the password from the current
raspberryto something a little harder to guess:pi@raspberrypi ~ $ passwd Changing password for pi. (current) UNIX password: Enter new UNIX password: Retype new UNIX password: passwd: password updated successfullyExpand the filesystem so it uses the entire SD card space. The easiest way to do so is using the
rasp-conftool. Start it as follows:pi@raspberrypi ~ $ sudo raspi-configIn the screen that shows up select the first option
Expand Filesystem:
After the operation finishes select to reboot the device or do so manually by:
pi@raspberrypi ~ $ sudo rebootRebooting the device will terminate your SSH connection. Reconnect with:
C:\>ssh pi@192.168.1.70Once connected switch to root:
pi@raspberrypi ~ $ sudo -i
root@raspberrypi:~#
Now set the timezone by copying the zoneinfo of your country to localtime:
root@raspberrypi:~# cp /usr/share/zoneinfo/Europe/Zurich /etc/localtimeYou can see a list of available locations by hitting the
tabkey twice, e.g., if you are in Europe hitting tab device after having enteredcd /usr/share/zoneinfo/Europegives you a list of countries:root@raspberrypi:~# cp /usr/share/zoneinfo/Europe/ Amsterdam Bratislava Copenhagen Istanbul London Monaco Prague Simferopol Tiraspol Volgograd Andorra Brussels Dublin Jersey Luxembourg Moscow Riga Skopje Uzhgorod Warsaw Athens Bucharest Gibraltar Kaliningrad Madrid Nicosia Rome Sofia Vaduz Zagreb Belfast Budapest Guernsey Kiev Malta Oslo Samara Stockholm Vatican Zaporozhye Belgrade Busingen Helsinki Lisbon Mariehamn Paris San_Marino Tallinn Vienna Zurich Berlin Chisinau Isle_of_Man Ljubljana Minsk Podgorica Sarajevo Tirane VilniusThe timezone should be set after a reboot (no need to do it right now). You can check the local time with:
root@raspberrypi:~$ date
Thu May  1 19:58:11 CEST 2014
If you want set a fixed IP for your raspberry by editing
/etc/network/interfaces. Change the original file:root@raspberryroot:~# cat /etc/network/interfaces auto lo iface lo inet loopback iface eth0 inet dhcp allow-hotplug wlan0 iface wlan0 inet manual wpa-roam /etc/wpa_supplicant/wpa_supplicant.conf iface default inet dhcp (Gateway Address from Nmap Scan)to something like that (I’m using the IP 192.168.1.77 with gateway 192.168.1.254):
root@raspberryroot:~# vi /etc/network/interfaces
root@raspberryroot:~# cat /etc/network/interfaces
auto lo

iface lo inet loopback
iface eth0 inet static
    address 192.168.1.77
    netmask 255.255.255.0
    gateway 192.168.1.254
To make the change effective (there’s no need to do so now) you can execute:
root@raspberryroot:~# ifdown eth0 && ifup eth0You’ll need to reconnect after changing the IP
When you reconnect after changing the IP you might get the following warning
C:\>ssh pi@192.168.1.77
@@@@@@@@@@@@@@@@@@@@@@@@@@@@@@@@@@@@@@@@@@@@@@@@@@@@@@@@@@@
@    WARNING: REMOTE HOST IDENTIFICATION HAS CHANGED!     @
@@@@@@@@@@@@@@@@@@@@@@@@@@@@@@@@@@@@@@@@@@@@@@@@@@@@@@@@@@@
IT IS POSSIBLE THAT SOMEONE IS DOING SOMETHING NASTY!
Someone could be eavesdropping on you right now (man-in-the-middle attack)!
It is also possible that the RSA host key has just been changed.
The fingerprint for the RSA key sent by the remote host is
35:33:47:1d:f3:6b:6e:3a:2f:cf:17:d8:e1:d5:02:6f.
Please contact your system administrator.
Add correct host key in /cygdrive/c/Users/Noon/.ssh/known_hosts to get rid of this message.
Offending key in /cygdrive/c/Users/Noon/.ssh/known_hosts:1
RSA host key for 192.168.1.77 has changed and you have requested strict checking.
Host key verification failed.
If you get the message on Windows, open the file given in the error message, e.g.,
c:/User/Noon/.ssh/known_hosts. Delete all entries related to your Raspberry Pi. In my case I had to remove the lines:192.168.1.77 ssh-rsa AAAAB3NzaC1yc2E... 192.168.1.70 ssh-rsa AAAAB3NzaC1yc2E...After that you should be able to connect again:
C:\>ssh pi@192.168.1.77
The authenticity of host '192.168.1.77 (192.168.1.77)' can't be established.
RSA key fingerprint is 35:33:47:1d:f3:6b:6e:3a:2f:cf:17:d8:e1:d5:02:6f.
Are you sure you want to continue connecting (yes/no)? yes
Warning: Permanently added '192.168.1.77' (RSA) to the list of known hosts.
pi@raspberrypi ~ $ sudo -i
root@raspberrypi:~#
Optionally you might want to add additional DNS servers. You can do so by editing
/etc/resolv.conf. For example, to add the Google DNS at 8.8.8.8:root@raspberrypi:~# cat /etc/resolv.conf domain lan search lan nameserver 192.168.1.254 root@raspberrypi:~# vi /etc/resolv.conf root@raspberrypi:~# cat /etc/resolv.conf domain lan search lan nameserver 192.168.1.254 nameserver 8.8.8.8You also might want to change the hostname of your Pi. You’ll need to edit two files. First, change the hostname in
/etc/hostname:root@raspberrypi:~# cat /etc/hostname raspberrypi root@raspberrypi:~# echo "bittorrentsync" > /etc/hostname root@raspberrypi:~# cat /etc/hostname bittorrentsyncNext, change the name in the last line of
/etc/hosts:root@raspberrypi:~# vi /etc/hosts root@raspberrypi:~# cat /etc/hosts 127.0.0.1 localhost ::1 localhost ip6-localhost ip6-loopback fe00::0 ip6-localnet ff00::0 ip6-mcastprefix ff02::1 ip6-allnodes ff02::2 ip6-allrouters 127.0.1.1 bittorrentsyncTo finish up the setup process update your Pi with
apt-get update && apt-get upgrade


The next part is about installing Bittorrent Sync.
Part 2: Installing and Configuring Bittorrent Sync
For security reasons it’s always a good idea to create separate users to run btsync. Create the user with:
root@raspberrypi:~# adduser --quiet --system --group --disabled-password btsyncNext download Bittorrent Sync:
 root@raspberrypi:~# wget http://btsync.s3-website-us-east-1.amazonaws.com/btsync_arm.tar.gz
 --2014-05-01 20:44:00--  http://btsync.s3-website-us-east-1.amazonaws.com/btsync_arm.tar.gz
 Resolving btsync.s3-website-us-east-1.amazonaws.com (btsync.s3-website-us-east-1.amazonaws.com)... 207.171.163.139
 Connecting to btsync.s3-website-us-east-1.amazonaws.com (btsync.s3-website-us-east-1.amazonaws.com)|207.171.163.139|:80... connected.
 HTTP request sent, awaiting response... 200 OK
 Length: 2241312 (2.1M) [application/x-gzip]
 Saving to: `btsync_arm.tar.gz'

 100%[==================================================================================================================>] 2,241,312    834K/s   in 2.6s

 2014-05-01 20:44:03 (834 KB/s) - `btsync_arm.tar.gz' saved [2241312/2241312]
Extract the file to
/usr/local/sbin/:root@bittorrentsync:~# tar -xvf btsync_arm.tar.gz -C /usr/local/sbin btsync btsyncYou can then delete the download:
root@bittorrentsync:~# rm -f btsync_arm.tar.gzBittorrent sync uses a single configuration file to store its setting. Create this file with:
root@bittorrentsync:~# /usr/local/sbin/btsync --dump-sample-config > /etc/btsync.confNow it’s time to start up
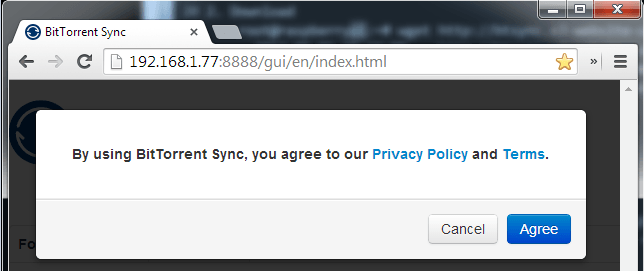
btsync:root@raspberrypi:~# /usr/local/sbin/btsync BitTorrent Sync forked to background. pid = 2232Bittorrent Sync gives you a nice web interface. Open up the webinterface on your host system by entering the IP address of your PI, followed by colon, followed by the port
8888in your browser. For example, to reach my Pi I usedhttp://192.168.1.77:8888The webinterface will first ask you to agree to the privacy policy and terms:

Next you have to enter a admin password:

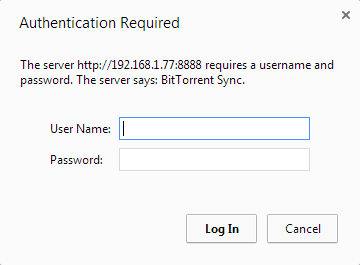
Login with user
adminand the password you just set:
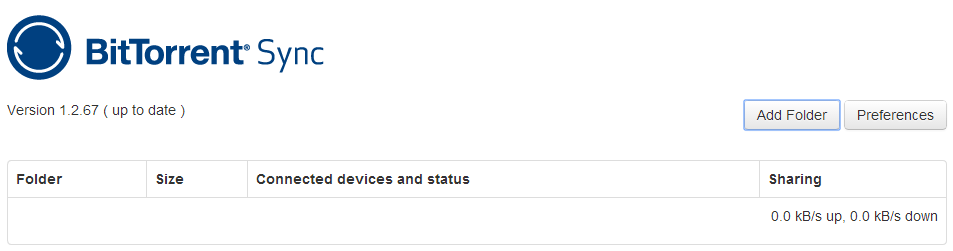
After that you should see an interface where you can add folders you like to sync:

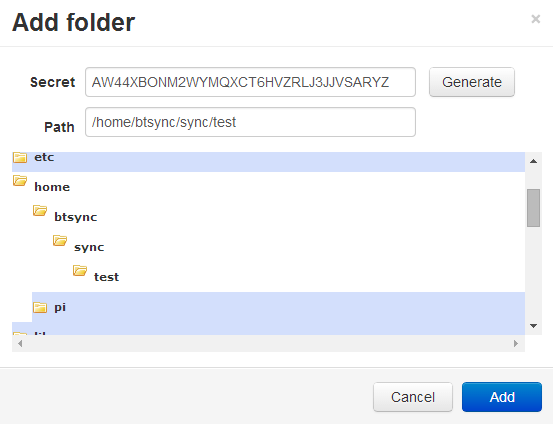
First create a test folder on our Pi (make sure to give ownership to
btsync, he’ll be the one running btsync later on):root@raspberrypi:~# mkdir -p /home/btsync/sync/test root@raspberrypi:~# chown btsync:btsync /home/btsync/sync/test/Next add this folder with the
add folderoption in the webinterface. You should get the following dialog:
Click
Generateto create a folder secret or enter a custom password. Then select the test folder/home/btsync/sync/testOn your host system install Bittorrent Sync too. Under
My Syncclickadd folderand enter the same secret as on your Pi. You can get the secret at any time by clickingSecret / QRon the web interface. Select an empty test folder to be synced:
Back on your Raspberry also create a test file in the folder that should be synced:
root@raspberrypi:~# echo "test" > /home/btsync/sync/test/test_raspberry.txtThe webinterface on Pi should show your host system, and the two folders should start syncing.
root@raspberrypi:~# ls -l /home/btsync/sync/test/
total 8
-rw-r--r-- 1 root root 14 May  1 21:04 file_on_windows.txt
-rw-r--r-- 1 root root  5 May  1 21:05 test_raspberry.txt
Bittorrent Sync works as expected, but we started the process manually. To make btsync start as a service on boot, I’m using the following init script from http://bernaerts.dyndns.org/:
#! /bin/sh
### BEGIN INIT INFO
# Provides: btsync daemon
# Required-Start: $syslog
# Required-Stop: $syslog
# Default-Start: 2 3 4 5
# Default-Stop: 0 1 6
# Short-Description: BTSync server daemon
# Description: Daemon script to run a BTSync permanent peer
# Placed in /etc/init.d.
### END INIT INFO
# Author: Nicolas Bernaerts < nicolas.bernaerts@laposte.net>
# Version:
#  V1.0, 06/09/2013 - Creation
#  V1.1, 09/09/2013 - Use under-priviledged system user

# description variables
PATH=/sbin:/usr/sbin:/bin:/usr/bin
DESC="BTSync server"
NAME="btsync"
USER=$NAME
DAEMON=/usr/local/sbin/$NAME
ROOT=/home/$NAME
PIDFILE=$ROOT/$NAME.pid

# Exit if btsync program is not installed
if [ ! -x "$DAEMON" ] ; then
echo "Binary $DAEMON does not exist. Aborting"
exit 0
fi

# Exit if btsync user home directory doesn't exist
if [ ! -d "$ROOT" ]; then
echo "User $USER does not exist. Aborting"
exit 0
fi

# Function that starts the daemon/service
# 0 - daemon started
# 1 - daemon already running
# 2 - daemon could not be started
do_start()
{
# If needed, start the daemon
if [ -f "$PIDFILE" ]
then
    echo "$NAME already running"
    RETVAL="1"
else
    start-stop-daemon --start --quiet --chuid $USER --name $NAME --exec $DAEMON -- --config /etc/btsync.conf
    RETVAL="$?"
    [ "$RETVAL" = "0" ] && echo "$NAME started"
fi

return "$RETVAL"
}

# Function that stops the daemon/service
# 0 - daemon stopped
# 1 - daemon already stopped
# 2 - daemon could not be stopped
do_stop()
{
# Stop the daemon
start-stop-daemon --stop --quiet --retry=TERM/30/KILL/5 --pidfile $PIDFILE --name $NAME
RETVAL="$?"
[ "$RETVAL" = "0" ] && echo "$NAME stopped"
[ "$RETVAL" = "1" ] && echo "$NAME was not running"

# remove pid file
rm -f $PIDFILE

return "$RETVAL"
}

# deal with different parameters : start, stop & status
case "$1" in
# start service
start)
    do_start
    ;;
# stop service
stop)
    do_stop
    ;;
# restart service
restart)
    do_stop
    do_start
    ;;
# unknown command, display help message
*)
    echo "Usage : $SCRIPTNAME {start|stop|restart}" >&2
    exit 3
    ;;
esac
Copy or download the script to
/etc/init.d/btsyncand make it executable:root@raspberrypi:~# wget -O /etc/init.d/btsync http://bernaerts.dyndns.org/download/debian/btsync/btsync root@raspberrypi:~# chmod +x /etc/init.d/btsyncTo test the init.d script, first terminate the running btsync process:
root@raspberrypi:~# ps aux | grep btsync
root      2232  0.7  0.9  71052  4368 ?        Ssl  20:48   0:09 /usr/local/sbin/btsync
root      2314  0.0  0.1   3544   808 pts/0    S+   21:11   0:00 grep btsync
root@raspberrypi:~# kill 2232
Then try starting the service:
root@raspberrypi:~# service btsync start
Storage path specified in config file does not exist.
Oops! We need to configure the storage path first.
To set the storage path, edit the config file
/etc/btsync.conf:root@raspberrypi:~# vi /etc/btsync.confchange line “storage_path” : “/home/user/.sync”, to “storage_path” : “/home/btsync/.sync”,. Then create this folder with:
root@raspberrypi:~# mkdir /home/btsync/.sync
root@raspberrypi:~# chown btsync:btsync /home/btsync/.sync
Now try to run the service again:
root@raspberrypi:~# service btsync start
By using this application, you agree to our Privacy Policy and Terms.

http://www.bittorrent.com/legal/privacy


http://www.bittorrent.com/legal/terms-of-use

BitTorrent Sync forked to background. pid = 2406
btsync started
Great! The startup script works.
Edit: To make
btsyncstart on boot run the following command:root@raspberrypi:~# update-rc.d btsync defaultsYou are all set. After a reboot the service user
btsyncshould be running Bittorrent Sync.


Bonus: Add external USB storage
One of the great benefits of Bittorrent Sync is having as much space as your harddisk give. The SD cards tend to be rather small, so let’s add an external USB drive to our Pi.
- First, attach the USB drive. Make sure to use a powered USB hub if your drive is powered by USB, since the Pi will likely not be able to provide the necessary power.
- Next run
dmesgto find out the device name:
      root@bittorentsync:~# dmesg | tail -n 17
      [  183.561127] usb 1-1.2.3.2: new high-speed USB device number 6 using dwc_otg
      [  183.662980] usb 1-1.2.3.2: New USB device found, idVendor=1058, idProduct=10a8
      [  183.663016] usb 1-1.2.3.2: New USB device strings: Mfr=1, Product=2, SerialNumber=3
      [  183.663036] usb 1-1.2.3.2: Product: Elements 10A8
      [  183.663056] usb 1-1.2.3.2: Manufacturer: Western Digital
      [  183.663075] usb 1-1.2.3.2: SerialNumber: 575845314138333837343534
      [  183.664124] usb-storage 1-1.2.3.2:1.0: USB Mass Storage device detected
      [  183.668404] scsi0 : usb-storage 1-1.2.3.2:1.0
      [  184.662618] scsi 0:0:0:0: Direct-Access     WD       Elements 10A8    1042 PQ: 0 ANSI: 6
      [  184.664248] sd 0:0:0:0: [sda] 976707584 512-byte logical blocks: (500 GB/465 GiB)
      [  184.665318] sd 0:0:0:0: [sda] Write Protect is off
      [  184.665354] sd 0:0:0:0: [sda] Mode Sense: 53 00 10 08
      [  184.666263] sd 0:0:0:0: [sda] No Caching mode page found
      [  184.666293] sd 0:0:0:0: [sda] Assuming drive cache: write through
      [  184.669613] sd 0:0:0:0: [sda] No Caching mode page found
      [  184.669648] sd 0:0:0:0: [sda] Assuming drive cache: write through
      [  188.195701]  sda: sda1
  ```
  In my case the external drive sits at ``/dev/sda1``

3. If you want to reformat your drive, make sure it is not mounted first:
root@bittorentsync:~# sudo umount /dev/sda1
then format it with
root@bittorentsync:~# sudo mkfs.ext4 /dev/sda1 -L Sync
4. If your drive is ready you can mount it with:
root@bittorentsync:~# sudo mount -t ext4 /dev/sda1 /media/USBDRIVE/
5. To probably want to make the device mount automatically on reboot. To this end, first find out the id of the device with:
root@bittorentsync:~# ls -l /dev/disk/by-uuid/
total 0
lrwxrwxrwx 1 root root 15 Jan 1 1970 993B-8922 -> ../../mmcblk0p1
lrwxrwxrwx 1 root root 10 May 1 21:20 e0bcd6da-6cf3-47eb-8c94-82e0a85c7392 -> ../../sda1
lrwxrwxrwx 1 root root 15 May 1 21:17 fc254b57-8fff-4f96-9609-ea202d871acf -> ../../mmcblk0p2
In my case the device has the id <code>e0bcd6da-6cf3-47eb-8c94-82e0a85c7392</code></li>
6. You need to add the id from the previous step to the <code>fstab</code> file. Make a backup of this file first:
root@bittorentsync:~# sudo cp /etc/fstab /etc/fstab.backup
7. After you backed up the file add your device id to <code>fstab</code> by adding a line similar to
UUID=e0bcd6da-6cf3-47eb-8c94-82e0a85c7392 /media/USBDRIVE ext4 rw, defaults 0 0
e.g, the file shoud look like:
proc /proc proc defaults 0 0
/dev/mmcblk0p1 /boot vfat defaults 0 2
/dev/mmcblk0p2 / ext4 defaults,noatime 0 1
UUID=e0bcd6da-6cf3-47eb-8c94-82e0a85c7392 /media/USBDRIVE ext4 rw, defaults 0 0</ol>
That’s it. Now the external drive should be mounted automatically and you have plenty of space to sync.
Archived Comments
Note: I removed the Disqus integration in an effort to cut down on bloat. The following comments were retrieved with the export functionality of Disqus. If you have comments, please reach out to me by Twitter or email.